|
The Personal Planner module offers an overview of a user's workload.
Example: Providers can see their appointment list, chart requests, patient needs list, overdue patient lists, dispensary orders, and lab orders.
 Key Tasks Key Tasks
Within the Personal Planner module, you can complete a variety of tasks from each tab. This can include the ability to:
- Display unapproved items (i.e., unapproved treatments)
- Display assigned or overdue patients
- Request appointments, charts, and patient needs
- Request dispensary items and lab orders
- Manage assigned forms and user forms
- Manage appointments
- Manage online appointment requests
Online appointment requests is functionality that is available through PatientAccess. It provides prospective patients the opportunity to submit appointment requests. The requests are then received and processed via the Personal Planner > Online Requests tab in axiUm.
Key Features
-
Webpage for online appointment requests: Prospective patients can easily access a webpage that allows them to fill in and submit an online appointment request. Patients can submit the following information:
-
Name, gender, birth date, phone, and email address
-
Reason for the appointment request
-
Insurance information, if applicable
-
Preferred appointment times
-
Answers to custom questions
-
Manage requests in axiUm: Once a patient submits an online appointment request, it is immediately available in the Online Requests tab in the Personal Planner module.
Staff members can easily complete any of the following to manage the requests:
-
Review the request, including patient information, request details, and any additional notes.
-
Link the request to a new or existing patient record.
-
If necessary, perform additional actions:
-
Re-assign the request to another staff member or group.
-
Change the request’s status manually.
-
Add notes to the request to track progress, communication with the patient, etc.
-
Schedule an appointment for the patient.
-
Ability to customize request statuses: As you work with online requests, you can change the status to indicate where it is in the process. Although four status codes are included by default, codes may be customized to meet the needs of your institution. Additionally, axiUm may be configured to change the status automatically when a specific event occurs.
Example: axiUm can be configured to change the request’s status to SCHED (Appointment scheduled) when an appointment has been created and scheduled for the patient.
-
New customizable email templates: Request statuses also offer the ability to send patient emails using customizable email templates. If configured and enabled, an email is triggered automatically when a request is changed to a specific status, allowing you to communicate effortlessly with the patient as the request is processed.
Example: When an appointment is scheduled for a request, an email can be automatically sent to the patient with the appointment details and a link to PatientAccess to complete any necessary medical forms ahead of time.
Staff Workflow
Managing a request involves the following steps:
-
Search for the request and review the information in the request.
This may include the patient's information, their reason for the appointment request, and their answers to custom questions (if applicable). If the request is not brand new, you can also review any staff notes and the request history.
-
Link the request to a patient record.
-
If a matching patient record exists in axiUm, you can link the request, and confirm any information that differs between the request and the patient record.
-
If a matching patient record does not yet exist in axiUm, you can create a patient record and link the request using the request information.
-
Schedule an appointment for the request.
When necessary, you can perform several other tasks:
Patient Workflow
The following sections describe the patient workflow for submitting online appointment requests.
Submit Requests
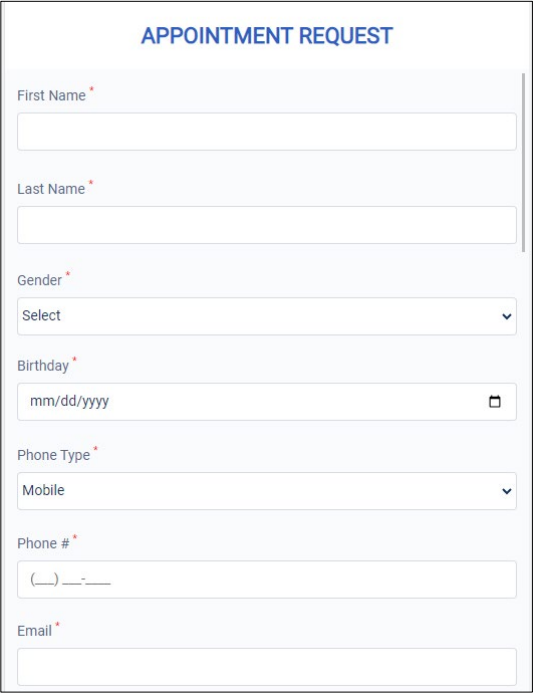
- Browse to the institution’s Appointment Request website, complete the fields as necessary, and click Submit.
Note: Any fields marked with an * are mandatory and must be completed.
| First Name / Last Name
|
Enter your first and last name.
|
| Gender
|
Select the gender that best describes you from the drop-down list.
|
| Birthday
|
Enter your date of birth.
|
| Phone
|
Select your preferred phone from the drop-down list and enter your phone number.
|
| Email
|
Enter a valid email address that can be used to contact you.
|
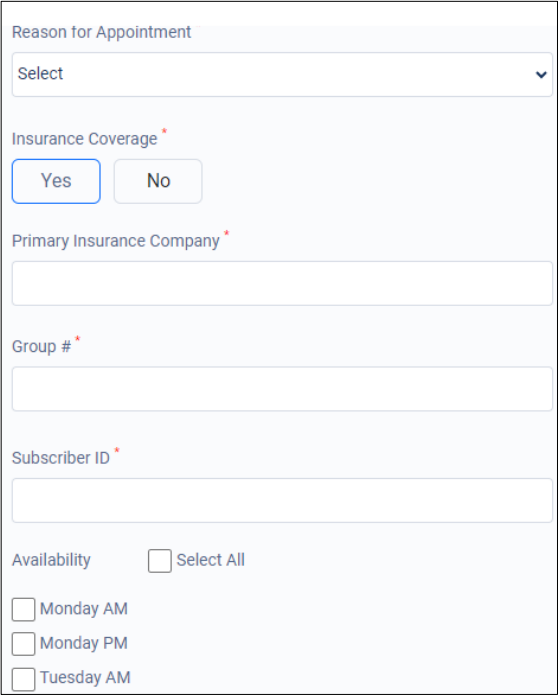
| Reason for Appointment
|
Select the reason for this appointment request from the drop-down list.
Note: This list is defined in axiUm.
|
| Insurance Coverage
|
Click Yes or No to indicate your insurance coverage status.
If No is selected, the remaining insurance fields are hidden.
|
| Primary Insurance Company / Group # / Subscriber ID
|
If Insurance Coverage is set to Yes, enter your insurance information, including the Insurance Company, your Group number, and your Policy/Subscriber number. |
| Availability
|
Select the checkboxes to indicate the days and times that you are available.
Tip: Click Select All to quickly indicate that you are available for any day and time.
|
| Custom Questions
|
If applicable, complete using any of the following:
-
Enter text in the field provided.
-
Select the appropriate answer from the drop-down list.
-
Select any checkbox answers that apply.
Note: These questions are defined in axiUm.
|
Receive Email Status Updates
Depending on configuration (status and template), patients may receive email notifications as the request is processed in axiUm.
Example: A user reviews the request and searches for the patient record. When a matching record is not found, they create a new patient record. When the record is created, the request status is changed to INPROG and an email is sent to the patient, indicating that their request is being processed.
PatientAccess Invitation/Registration
At the completion of the request, the patient should be invited to register for PatientAccess, allowing them to complete forms, and review information prior to their appointment.
Tip: Add the link for the PatientAccess self-registration page in the email template used when the patient’s appointment has been scheduled.
Access
You can open the Personal Planner module using one of the following methods:
- Nav Panel: Under Education, click Personal Planner or the (
 ) icon. ) icon.
- Menu bar: From the Actions menu,Personal Planner....
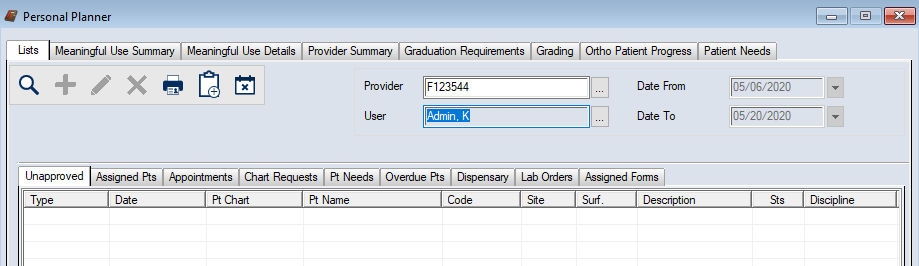
Organization
The Personal Planner module is organized by tabs and sub-tabs and offers a toolbar with a series of icons.
The Lists tab is the main tab where most activity takes place and may contain a variety of sub-tabs.
All remaining tabs in the Personal Planner are custom Crystal Reports that are created, then uploaded into axiUm. These reports are valuable in offering users and providers relevant information all in one place.
Personal Planner Field Definitions
Note: Some fields are only available or enabled from specific sub-tabs.
| Field |
Definition |
| Provider
|
Click the ellipsis to select the provider number to search by. |
| User |
Click the ellipsis to select the user name to search by. |
| Date From / Date To |
Select date ranges to filter the search results.
Note: These fields are disabled in the Unapproved, Overdue Pts, and Assigned Forms sub-tabs.
|
| Include Group Assignments |
Select the checkbox to include forms assigned to a Messenger group that the selected user belongs to.
Note: This is only available in the Assigned Forms sub-tab.
|
| Include User’s Previous Assignments |
Select the checkbox to include forms that were previously assigned to the user.
Note: This is only available in the Assigned Forms sub-tab.
|
| Show Open Forms Only |
Select the checkbox to show only results for forms with an Open status.
Note: This is only available in the Assigned Forms sub-tab.
|
Toolbar Icons
-
Search for Data ( ): Allows you to search for records based on the set search criteria. ): Allows you to search for records based on the set search criteria.
-
Create a new Record ( ): Allows you to display the associated window and add a new record. ): Allows you to display the associated window and add a new record.
Note: The window that opens depends on the sub-tab you have open.
-
Edit Record ( ): Allows you to display the associated window and modify a record. ): Allows you to display the associated window and modify a record.
Note: The window that opens depends on the sub-tab you have open.
-
Delete Record ( ): Allows you to select a record from the list and click the icon to delete the record. ): Allows you to select a record from the list and click the icon to delete the record.
-
Print Report ( ): Allows you to print the Crystal Report associated with the data in the selected tab. ): Allows you to print the Crystal Report associated with the data in the selected tab.
Example: Click the icon in the Chart Requests tab to print the Chart Requests report.
-
User Forms ( ): Allows you to display the User Forms window and manage forms associated to the selected user. ): Allows you to display the User Forms window and manage forms associated to the selected user.
-
Clinic Time Exceptions ( ): Allows you to display the Provider Clinic Time Exceptions window and manage exceptions to provider work schedules. ): Allows you to display the Provider Clinic Time Exceptions window and manage exceptions to provider work schedules.
Note: To enable this icon, the Provider field must be set.
|